


Table of contents
This was originally published on my blog.
In this guide I explain how to deploy your Next.js application to a VPS as well as the different parts of the process. If you're only looking for the NGINX configuration files, you can find them in this gist.
If you find yourself in a situation (like I did) where your only deployment option for a Next.js application is to self-host on a VPS, this article is for you.
This article does not promote self-hosting your Next.js applications, although I should write more on that in a separate article. It's a great learning experience to deal with servers directly (without the serverless abstraction).
You need to be mindful that you can be limited by client/project requirements on what tools to use, especially for infrastructure. In which case, what do you do?
Note: the Next.js application we will be deploying uses the Pages Router.
Assumptions
You've configured your domain name to point to your VPS' IP address.
You've configured your SSH key(s) to access the VPS and to connect to GitHub.
You're accessing the VPS with root privileges, so I don't need to use
sudoin the commands of this article.
This is going to be as straightforward as your understanding of Next.js itself and servers in general.
What's Next.js?
You need to understand what it is your deploying to be able to deploy it.
So what's Next.js? Well, it depends how you're using it.
If you're using the framework to build an SPA (not SSG), your application is essentially a bunch of static files (HTML, CSS and JavaScript).
However, if need SSR/SSG/ISR or any of these features, your Next.js application needs to run as a Node server.
Deployment
Given that our Next.js application is essentially different for different contexts, it's only natural that the deployment of it will also be different.
Deploying static files (static export)
A fundamental concept is in play here. Our application is just a bunch of static files, how do we deploy them?
In order to deliver these files to the client (GUI browser, CLI browser -Lynx for eg-, curl... whatever is requesting the resources), we need a web server. It does not happen magically, everything is deliberate.
(This will apply to any kind of file you want to serve.)
We'll be using NGINX as a web server in this guide, so make sure to install it on your VPS if it's not already installed: NGINX installation guide.
In summary, this is how we'll use NGINX:
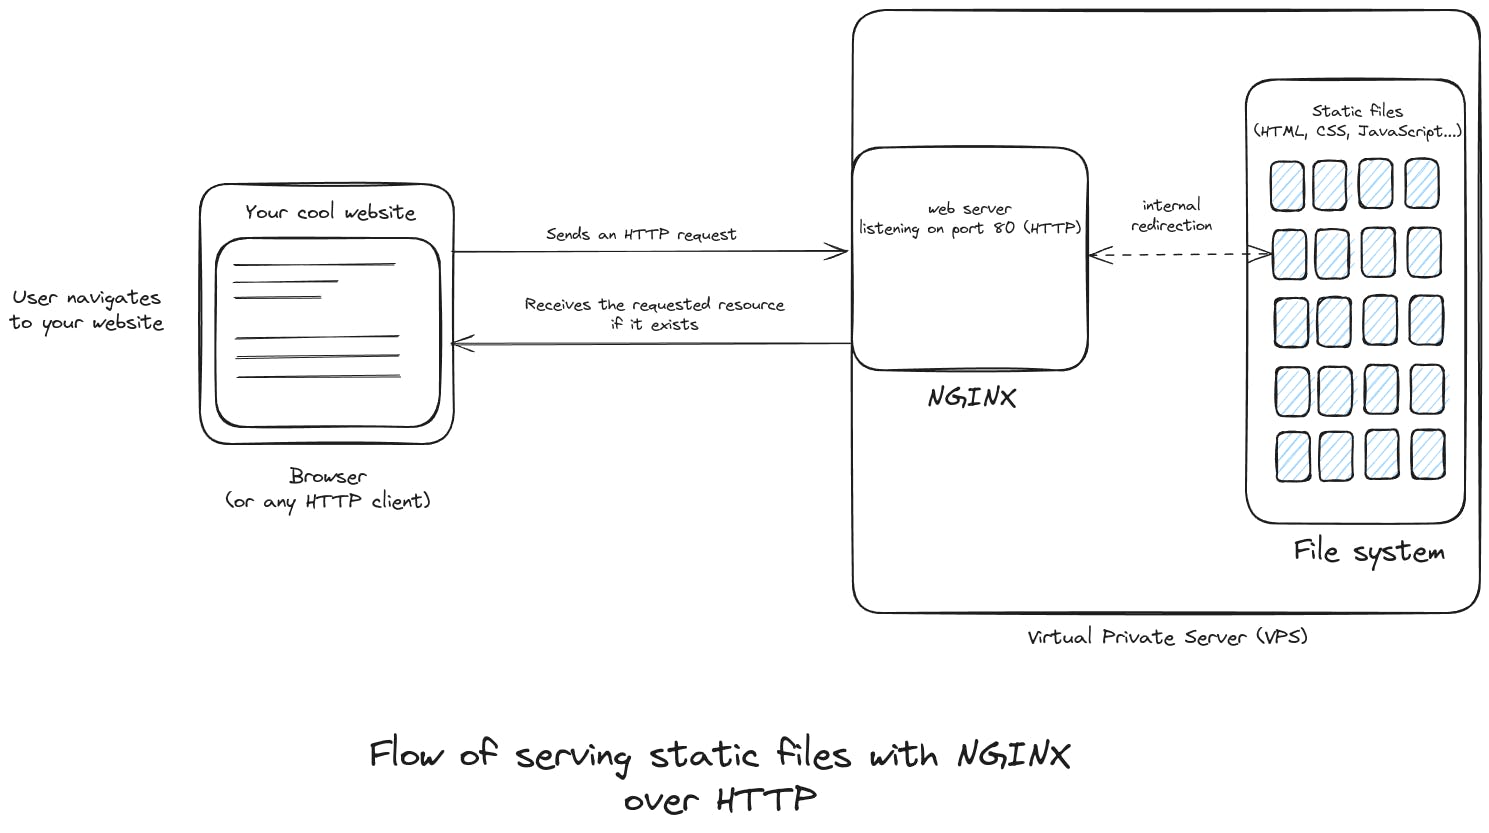
After you clone your Next.js project and build it for a static export, an out/ directory will be generated for the static build (at the time of writing. The folder name might change in the future).
The out/ folder contains the static files of our Next.js SPA application. In order for NGINX to serve files, it needs to look into a directory for them. We're going to place our project(s) in the /srv directory.
You'll often see websites placed on directories like /var/www/ or /var/www/html/ etc. It usually doesn't matter where you place your project, especially if you're only hosting one website.
According to the FHS, /srv is used for site-specific data which is served by this system. I like to stick to the standard.
After you cd into your Next.js project, we'll copy the generated out/ directory into /srv with the following command:
cp -r out /srv/<project name>
In addition to copying the out/ directory, the command will rename it to whatever you replaced <project name> with.
Configuring NGINX to serve static files over HTTP
As stated earlier, nothing happens magically, so in order to get the behavior above, we need to configure NGINX accordingly. For simplicity's sake, we're going to only edit the default NGINX configuration file located at /etc/nginx/sites-available/default.
Once you open that file with the text editor of your choice, you'll see some pre-existing configuration, we're going to be interested in the server block. The configuration should look something like this, minus a few comments:
server {
    listen 80 default_server;
    listen [::]:80 default_server;

    # SSL configuration
    #
    # listen 443 ssl default_server;
    # listen [::]:443 ssl default_server;
    #
    # Note: You should disable gzip for SSL traffic.
    # See: https://bugs.debian.org/773332
    #
    # Read up on ssl_ciphers to ensure a secure configuration.
    # See: https://bugs.debian.org/765782
    #
    # Self signed certs generated by the ssl-cert package
    # Don't use them in a production server!
    #
    # include snippets/snakeoil.conf;

    root /var/www/html;

    index index.html index.htm index.nginx-debian.html;

    server_name _;

    location / {
        # First attempt to serve request as file, then
        # as directory, then fall back to displaying a 404.
        try_files $uri $uri/ =404;
    }
}
Even if you've never used NGINX before, you can make an educated guess what the configuration does.
It's listening on port 80, which is the default port number for HTTP traffic.
It sets a root directory
/var/www/html.It serves as entry point one of these files (in this order)
index.html,index.htm,index.nginx-debian.html. Fun fact, the reason.htmis a valid HTML extension is due to limitations in some systems that accept at most 3 characters for filename extensions.The
locationblock seems to serve the rest of the static files if found, otherwise return a 404 status code, as the comment explains.
Let's fix it up to serve our Next.js project. Change the root directive to point to our project's build:
root /srv/<project name>;
Change the server_name directive to use your domain name:
server_name example.com;
Change the try_files directive to this, so that when a path is requested, an HTML file is returned with the same name if it exists.
try_files $uri.html $uri $uri/ =404;
To check if your NGINX configuration is correct in terms of syntax, run:
nginx -t
Now we must restart the NGINX service. Make sure to do this after any changes you make to the configuration file:
systemctl restart nginx.service
Your static Next.js website should be accessible now. Let's test it out.
To check if NGINX is serving files correctly, run the following command. This should return the index.html file.
curl localhost
If it doesn't:
Check if NGINX is running with
systemctl status nginx.service.Check if the path you provided in the
rootdirective may be incorect.Make sure the path you provided in
rootdirective exists and contains your static files.
Let's test out the website using the domain name. Keep in mind that we're still using HTTP.
curl http://example.com
If the command above does not return the index.html, make sure that you configured your domain name's DNS properly to point to the VPS' IP address.
The reason I started with HTTP configuration is to decrease the complexity and the number of factors that come to play with NGINX. Hopefully you've managed to get it setup successfully.
Now it's time to get HTTPS working.
Configuring NGINX to serve static files over HTTPS
Why? Because you don't want your users to use your website on top of an insecure protocol (HTTP), especially if you're dealing with sensitive data. Plus, it's nice to have an SSL certificate. Feel free to read Why Use HTTPS by Cloudflare.
What changes do you reckon we should make to the NGINX configuration to use HTTPS?
It's a different protocol, so a different kind of traffic.
It uses SSL/TLS, so we need to setup certificates and private keys.
To handle the above, we'll use Certbot which is a free utility that generates SSL certificates and configures HTTPS for you.
Install it on your VPS:
apt install certbot python3-certbot-nginx
Now we'll let Certbot do its magic!
certbot --nginx -d example.com
You'll be prompted with a couple of questions, and once you answer accordingly, Certbot should generate your SSL certificate as well as configure NGINX for you.
Once you open /etc/nginx/sites-available/default, you'll see that the configuration Certbot added will be followed with # managed by Certbot.
Here are some of the things that Certbot adds to your NGINX configuration:
listen 443 ssl;
ssl_certificate /etc/letsencrypt/live/example.com/fullchain.pem;
ssl_certificate_key /etc/letsencrypt/live/example.com/privkey.pem;
include /etc/letsencrypt/options-ssl-nginx.conf;
ssl_dhparam /etc/letsencrypt/ssl-dhparams.pem;
These enables your NGINX server to listen to traffic on the port number 443 which is the default one for HTTPS traffic. Additionally this links to the generated SSL certificate and private keys.
Certbot may also add this to your configuration, which listens on port 80 (for HTTP traffic) and redirects it to HTTPS, enforcing a more secure communication, otherwise return a 404 error status code.
server {
    if ($host = example.com) {
        return 301 https://$host$request_uri;
    } # managed by Certbot

    server_name example.com;
    listen 80;
    return 404; # managed by Certbot
}
Deploying a Next.js server
This is for projects that require SSR, SSG, ISR, or any of these features. As I mentioned earlier, now your Next.js needs to step up to a Node server to fulfill your requirements.
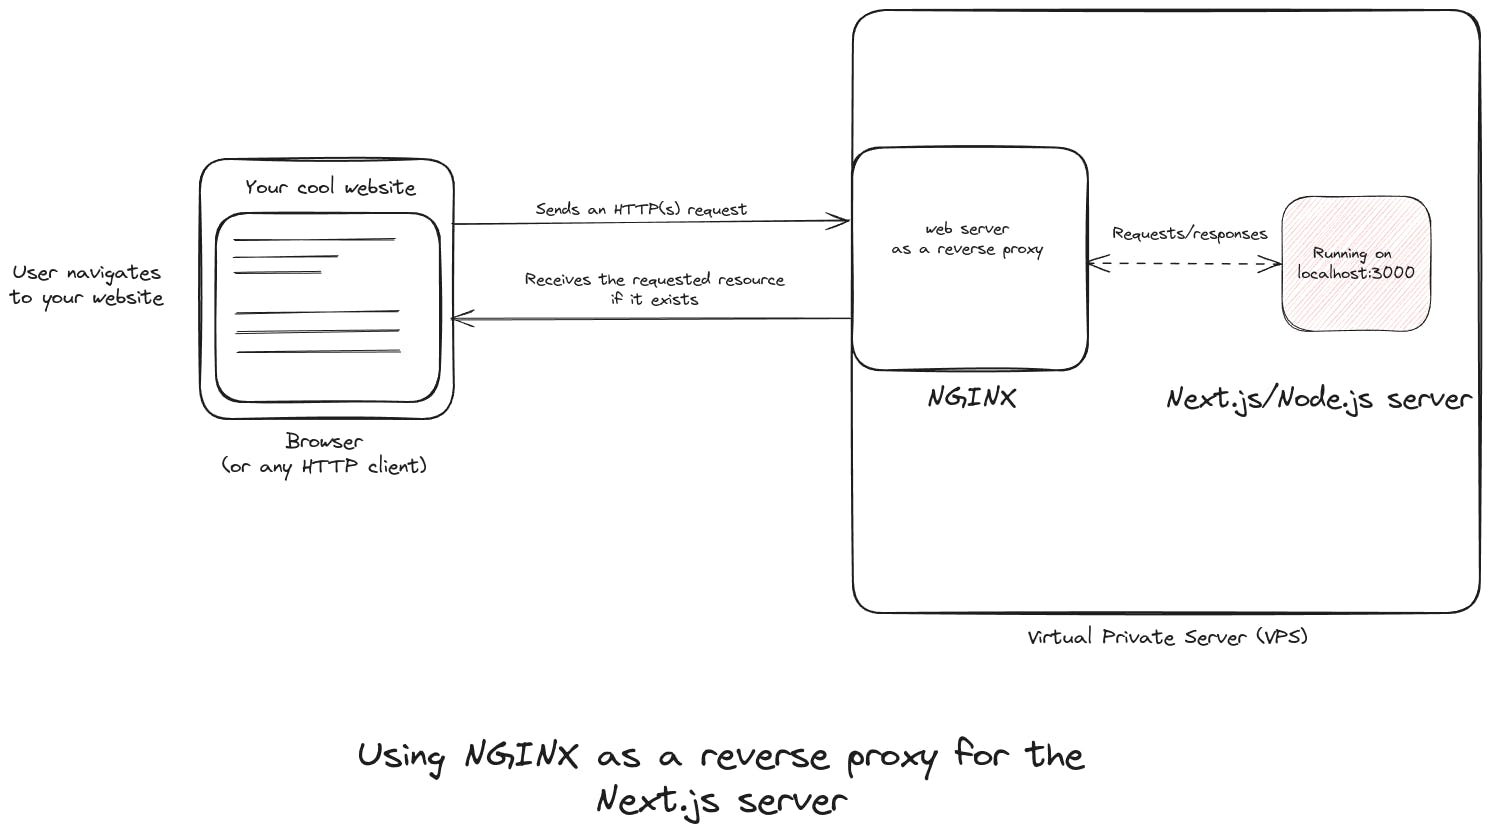
An illustration of the deployment:
To keep things simple, this time we'll clone our Next.js repository to /srv directory. To run a production build of Next.js application, we don't require all the content of the project, but we'll keep them nevertheless.
After you build your project, run the next start script with whatever package manager you're using. You should be able to get back an HTML file when you curl localhost:3000 (or whatever port you configured). Once you've confirmed that your Next.js application runs successfully, stop it.
Running Node.js applications in production
In a production environment, it's unwise to assume your server applications will continue running ad infinitum. Many things can go wrong which result in shutting down your applications:
Runtime errors may stop the server application from running.
As part of maintenance procedures, your hosting provider may restart your VPS.
Your server may catch fire, or experience an electric outage. Shit happens.
Bottom line is, your application must tolerate this kind of situations, by restarting when it shuts down, and by running on startup after system reboots etc.
A popular tool for the job is PM2, which is a process manager for your Node.js applications.
If you're using npm, install it globally with the following command:
npm install -g pm2
If the installation was successful, this command should return PM2's version:
pm2 --version
After you cd into your project's directory, run your Next.js application through PM2 with the following command:
pm2 start npm --name <application name> -- start
Replace
npmwith whatever package manager you're using.The double dash
--indicates the end of the options/arguments list of a command, so thatstartis considered an argument fornpmand notpm2.
You can check if the Node.js process is running with pm2 status.
In order to run your Node.js applications on startup, PM2 itself must be running, in order to do that, run this command:
pm2 startup
This ensures that PM2 runs on system startup.
Similarly, run this command so that PM2 registers the application and run it on startup:
pm2 save
You can read more about this this in PM2's documentation.
Configuration NGINX as a reverse proxy
As illustrated in the image above, NGINX will "forward" the requests it receives to the Next.js application (which is a Node.js server) and returns to the client whatever Next.js returns, acting as an intermediary. This is the basic functionality of a proxy.
Open the configuration file /etc/nginx/sites-available/default, and replace it with:
server {
    server_name example.com;

    location / {
        proxy_set_header X-Forwarded-For $proxy_add_x_forwarded_for;
        proxy_set_header X-Real-IP $remote_addr;
        proxy_set_header Host $http_host;

        proxy_http_version 1.1;
        proxy_set_header Upgrade $http_upgrade;
        proxy_set_header Connection "upgrade";

        proxy_pass http://localhost:3000;
        proxy_redirect off;
        proxy_read_timeout 240s;
    }

    listen 443 ssl default_server;
    listen [::]:443 ssl default_server;
}
For HTTPS configuration, go through the process mentioned above with Certbot.
Closing thoughts
A couple of weeks ago, I was struggling with this deployment for a client. I never really understood NGINX, because I never worked with it directly before. However I am very glad I was presented with this opportunity!
It took me an entire day to debug its configuration and understand what the directives are doing to get the reverse proxy working. What can I say, I am a masochist, so I enjoy this.
I hope you benefited from it.
Stay in touch
If you'd like to stay updated with my blog, reach out, or see what I am up to, you can find me on Twitter.
Thumbnail picture by Aron Visuals on Unsplash